
Declutter & Organize Your Fridge
The refrigerator is one of the hardest-working appliances in your home. It runs 24/7, keeping your food fresh and ready to use. But without regular maintenance, it can quickly become cluttered and chaotic, leading to wasted food, unpleasant odors, and unnecessary stress. If your fridge is overdue for a refresh, this step-by-step guide will help you declutter, deep clean, and organize your refrigerator like a pro. Let’s get started!
Step 1: Prepare for Success
Before you dive in, take a few minutes to prepare. You’ll need:
A trash bag or compost bin for expired and spoiled items.
Warm soapy water or an all-purpose cleaner.
Microfiber cloths or sponges for wiping down surfaces.
Optional: Clear organizing bins or baskets for grouping similar items.
A cooler with ice packs for storing perishable items while you clean.
Set aside 30 minutes to an hour for this task. Turn on some music or a podcast to keep you motivated!
Step 2: Empty Everything Out
Take every single item out of your fridge. This step is essential because it allows you to:
See everything you have.
Identify items that are expired, spoiled, or no longer needed.
Make space for a thorough cleaning.
As you remove items, check expiration dates and toss anything that’s past its prime. If you find foods that are still safe but won’t get used (like a jar of olives you bought for a recipe months ago), consider adding them to a donation box for a local food pantry.
Step 3: Deep Clean the Interior
Now that your fridge is empty, it’s time to clean it from top to bottom. Follow these steps:
Remove shelves and drawers (if possible). Wash them in warm, soapy water, rinse, and dry thoroughly before putting them back.
Wipe down the interior surfaces, including walls, corners, and door seals, using a damp cloth and mild cleaner. For stubborn stains, mix a paste of baking soda and water and gently scrub.
Dry all surfaces completely to prevent mold or mildew.
This step will leave your fridge sparkling and smelling fresh, setting the stage for a more organized system.
Step 4: Group and Categorize
While your fridge is drying, take some time to group your food items by category. Here are some common categories to get you started:
Condiments and sauces
Dairy products (milk, cheese, yogurt, butter)
Proteins (meat, fish, eggs)
Fresh produce (fruits and vegetables)
Beverages (juices, sodas, wine)
Ready-to-eat foods (leftovers, snacks)
Group similar items together so you can see what you have at a glance. This is also a great time to consolidate duplicates (e.g., two half-empty ketchup bottles).
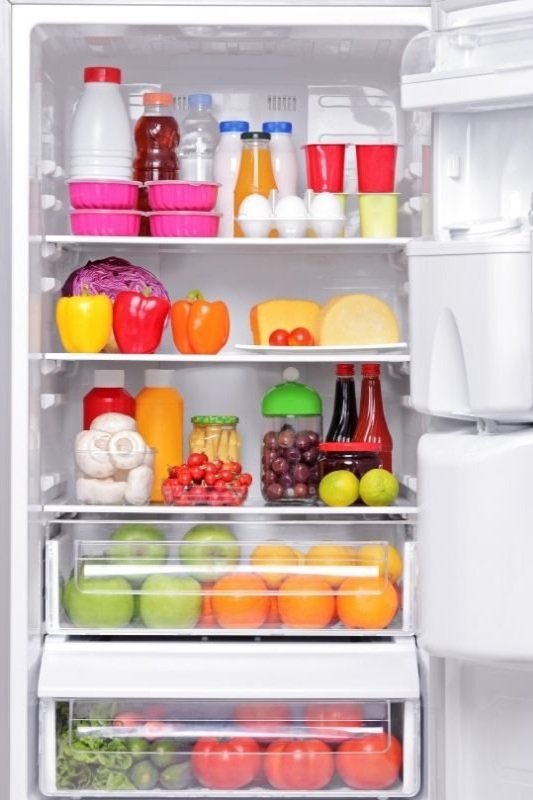
Step 5: Organize Strategically
Not all parts of your fridge are created equal. Different zones have different temperatures and humidity levels, so it’s important to store items where they’ll stay fresh the longest. Here’s a breakdown:
Top Shelves:
Store ready-to-eat foods like leftovers, snacks, and drinks.
Avoid placing raw meat here to prevent cross-contamination.
Middle Shelves:
Keep dairy products like yogurt, cheese, eggs, and butter.
This area has a stable, consistent temperature that’s ideal for these items.
Bottom Shelves:
Place raw meat, poultry, and seafood here, ideally in a leak-proof container to prevent drips and contamination.
Crisper Drawers:
Use one drawer for fruits and another for vegetables. Many fridges have adjustable humidity settings; fruits prefer low humidity, while vegetables thrive in higher humidity.
Fridge Door:
Store condiments, juices, and items with preservatives here. This is the warmest part of the fridge, so avoid placing eggs or milk here.
Step 6: Use Organizing Tools
Investing in a few organizing tools can make a world of difference in maintaining a tidy fridge. Here are some helpful options:
Clear Bins: Use these to group smaller items like condiments, snacks, or deli meats. They make it easy to pull out what you need.
Lazy Susans: Perfect for jars, bottles, and other small items. A quick spin lets you see everything.
Labels: Label bins or shelves to keep everyone in your household on the same page.
Egg Containers: These can save space and keep eggs protected.
Drink Can Holders: Stack soda or sparkling water neatly to maximize space.
Step 7: Maintain Your System
Congratulations—your fridge is now clean and organized! To keep it that way, follow these maintenance tips:
Weekly Check: Before grocery shopping, take a quick inventory of your fridge. Toss expired items and make a list of what you need.
Clean Spills Immediately: Wipe up messes as they happen to prevent sticky spots and odors.
Rotate Stock: Use the "first in, first out" method: place newer items behind older ones so nothing gets forgotten.
Restock Thoughtfully: When unpacking groceries, take an extra minute to group and place items in their designated spots.
Final Thoughts
An organized fridge is more than just a nice-to-have; it can save you time, money, and stress in the long run. With less clutter and better visibility, you’ll know exactly what you have on hand, which means fewer forgotten leftovers and more delicious meals. Plus, maintaining a clean fridge reduces the risk of cross-contamination and keeps your food fresher longer.
So go ahead—grab those cleaning supplies and tackle your fridge today. Your future self will thank you every time you open the door to a beautifully organized space!

Jessica is the founder of Signature Organizing, a Professional Home Organizing Business in Washington (servicing the greater Eastside and Seattle area). She loves transforming chaos into functional spaces and is known for bringing creative solutions to improve the quality of life for her clients. She shares her tips and tricks on Instagram @signatureorganizing
